Pixel Art Laser Gun Flash Pixel Art Laser Muzzle Flash
Research
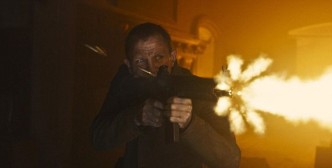
I want my cage wink to look and feel similar information technology belongs in a Overwatch style game. I want it to be cartoony and exaggerated.
-Primary bear on bullet firing muzzle wink:


-Secondary laser beam effects and cage flash:


My muzzle flash design will not comprise gruesome elements, on the reverse, it will resemble energy beams, fitting in the exaggerated drawing style of my game, and appealing to the audition.
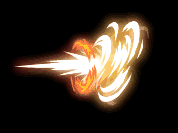
Analysing muzzle flashes

Muzzle flashes are made out of two main parts. To recreate one I will accept to make 2 graphics, one that shoots forward, and the other and flares outwards.
Concept generation
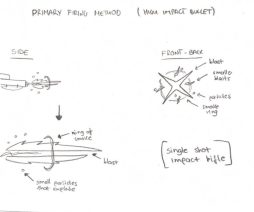
The chief firing method volition have a significantly unlike cage flash than the 2nd one. The first one volition resemble a standard cartoon styled flash of energy, and volition exist fabricated up of 3 main graphics: the master blast, the pocket-size exploding particles near the butt of the gun, and the rings of smoke.
The beginning volition be made in Photoshop, the other two in Unreal Engine'south particle system.
In Photoshop, I used the pen tool to trace my concept of the unlike parts that make upwardly the muzzle flash. In this case, the main blast, small lightning particles and the back blast that will be seen from the front view.


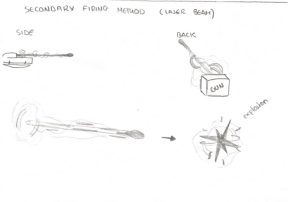
The secondary firing method will resemble a cartoon styled free energy beam.
Considering this is a ane hit kill, the gun will have to charge for half a second earlier firing, to give the impression of a high power shot. To create this beam I will have to design a few rectangle shaped graphics, apply them to planes and in Unreal Engine offset the timing to friction match up the firing blitheness.
In Photoshop, I created 2 beams with the gradient tool. These will be used for the actual main light amplification by stimulated emission of radiation axle, and smaller beams. For extra rotation elements that will show during the charging animation of the axle, i created "HUD" elements past deleting slices out of a cylindrical "doughnut" shaped layer.


Digital Graphics can be of these styles:
-Photo-Realistic
Attempts to imitate real-life follows realistic proportions, lighting and physics rules. (E.K: Call of Duty, Mass Effect, Assassins Creed)

-Jail cell-Shaded
Imitates sometime-school animation shading and style. Shadows are non graduated, but rather blocky. (E.M. Zelda Wind Waker, Borderlands, Pokémon Sunday/Moon)

-Exaggerated
Drawing in appearance, unrealistic proportions with exaggerated features. This manner is best suited for younger audiences. (Due east.G. Crash Bandicoot, Lego Dimensions, Mario)

There are ii types of graphics:
Raster
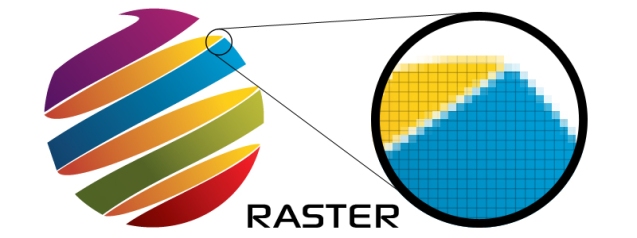
Raster graphics are best used for non-line art images; specifically photographs, scanned artwork or detailed graphics. However, because raster images are pixel-based, they suffer image degradation. Just like photographic images that get blurry and imprecise when scaled up, a raster image gets jagged and rough (when you look shut enough, y'all tin begin to see the individual pixels that incorporate the paradigm).
The raster format is resolution-specific — pregnant that raster images are defined and displayed at one specific resolution. Resolution in raster graphics is measured in dpi, or dots per inch. The higher the dpi, the better the resolution. Ameliorate resolution, however, comes at a toll. Merely equally raster files are significantly larger than comparable vector files, high resolution raster files are significantly larger than depression resolution raster files. Overall, as compared to vector graphics, raster graphics are less economical, slower to display and print, less versatile and more unwieldy to work with.
Common raster formats include TIFF, JPEG, GIF, PCX and BMP files.
Vector

Different pixel-based raster images, vector graphics are based on mathematical formulas that define geometric primitives such as polygons, lines, curves, circles and rectangles. Because vector graphics are composed of truthful geometric primitives, they are best used to represent more structured images, similar line art graphics with flat, uniform colors, for example logos, letterhead, UI elements, sprites and fonts.
Vector-based graphics are more versatile and like shooting fish in a barrel to use than raster images. The near obvious reward of vector images over raster graphics is that vector images are quickly and perfectly scalable. There is no upper or lower limit for sizing vector images. Furthermore, unlike raster graphics, vector images are not resolution-dependent. Common vector formats include AI, EPS, CGM, WMF and PICT (Mac).

As yous can clearly meet, raster graphics are made from pixels; a single point in a graphic epitome. A pixel is a infinitesimal surface area of illumination on a brandish screen, i of many from which an image is composed.
![]()
Saving Digital Graphics
Images tin be of different File Types:
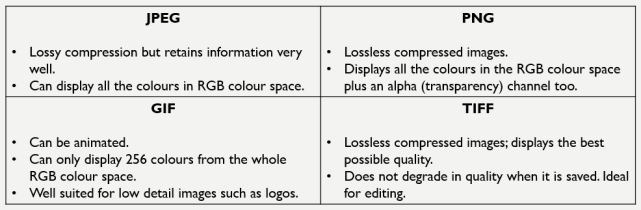 PNG
PNG
PNG is a lossless pinch blazon. It is often used where the graphic might be changed past another person or where the epitome contains layers of graphics that demand to exist kept separate from each other. It is high quality.
JPEG
JPEG is frequently used for digital camera images because it has a adequately pocket-size file size for the quality that it displays. JPEG is a lossy format that offers a higher compression charge per unit than PNG in the trade-off for quality.
GIF
GIF compresses images to a maximum 8-bit colour depth, making it unsuitable for high-quality photographs. GIF is often used where transparency is needed on the graphic. GIF can also be used to store simple blithe images.
In a professional environment, when saving images for games development we would save them in 2 formats: a source image, and an output epitome.
The source image would be stored every bit a very large lossless image (e.thousand. PNG or TIFF), and a much smaller lossy compressed output paradigm is saved for the terminal game. If we need to increase the resolution of textures (for example doing a HD remastered game) we simply load upwardly the source paradigm again and re-salve a dissimilar output image.
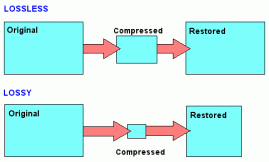
When saving an image, nosotros use compression to reduce its overall file size.
Compression tin can be Lossy or Lossless.
Lossy compression removes data that it deems unnecessary.
Lossless compression means that every bit the file size is compressed, the picture quality remains the aforementioned.

Digital paradigm capturing is the procedure of creating a digital image file directly using a camera, scanner or by using a drawing tablet in a media creation software.
Optimisation
As game developers we have to optimise as much as possible to get file sizes down to exist every bit small as possible whilst keeping quality. We therefore tin can use various things to help us optimise, including pinch.
Chip Depth
Bit depth refers to the amount of bits (or information) is used in an image. A unmarried bit is either 0 (off) or 1 (on). A 1 bit/channel means that there is 1 bit each for Red, Light-green, and Blue. And through diverse combinations tin create eight different colours.

Storage of epitome assets
Storage of image assets is a very useful way to store things like textures, graphics and text styles so that others can hands access them. This is very useful within the games industry as most companies accept numerous teams who all need to access the aforementioned assets. Beingness able to transfer files betwixt colleagues really speeds up production as y'all don't demand to wait around for the files to transfer.
File sizes are often an issue when storing images. The size of a file can be an outcome if it is too big.
Prototype file formats are the normal way to store digital graphics and images. They are made of either pixels or vector data, and even the mixture of both. The image file size is shown by the number of bytes. The greater number of bytes, the bigger the file is. Having a smaller file size means it's easier and quicker to store or transfer data, images and graphics between computers, programs and difficult drives.
One of the main reason why Storage of paradigm assets is important is to produce quick transfers between files.
One of the chief rules you follow for proficient storage of avails is to the "Power of 2". The "Power of Two" dominion is a primal necessity due to the way game engines work.
In essence, "Power of Two" is a grade of data 'optimisation', a necessity so images are as efficient and 'calorie-free' as possible, whilst simultaneously providing an advisable visual feel.
For instance having a texture that is 128×128 pixels large will mean that the file is pocket-sized, which allows it to exist transferred quicker and stored easier. This allows textures like this to exist used on online games so they can run smooth and fast without whatsoever bug.
Having a bigger Image for example, 1024 10 1024 will allow the quality to increase, giving a cleaner and sharper epitome, but past doing this, the amount of storage this file will demand will increment, thus prolonging loading times.
Adobe Illustrator is used to create vector graphics, as opposed to raster graphics (created in Adobe Photoshop).
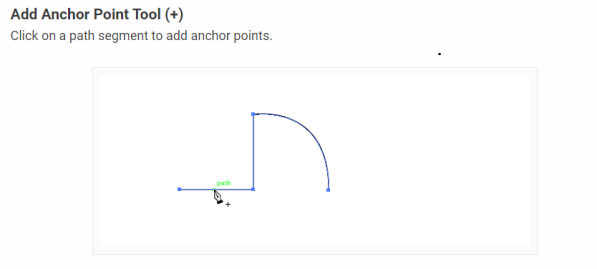
The main tool used to create a graphic is the "pen tool".
The Pen tool is the well-nigh powerful tool in Illustrator. It allows you lot to define your ain ballast points, as well every bit adjust the curve associated with those anchors, just by manipulating two control points associated with each anchor (called handles).
By default, the Pen tool generates sharp-angled anchors, not smooth anchors. You tin can create smooth lines by clicking and dragging an anchor and moving the anchors to match your desired shape.


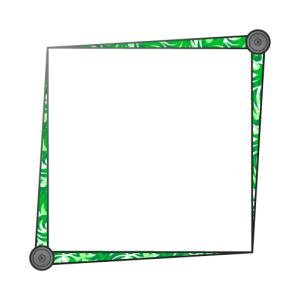
I used Adobe Illustrator to create a Player icon and a Mini-map frame.
 To create the player icon I started off past creating a new 64×64 pixel canvas. then I dragged out a symmetrical circle (pressing shift whilst dragging to lock the proportions). To add the pointed side, I selected the side anchor with the "direct selection tool", dragged it outwards and converted that aforementioned anchor to curve-less point. I then changed the make full and stroke of the icon to gradients, adding finishing touches to the graphic.
To create the frame I used the same tools but on a 512×512 canvas, and dragged out a 256×256 pixel guide square to aid the design of the frame.

Pixel art is a course of digital art, created through the utilise of software, where images are edited on the pixel level. The majority of graphics for 8-bit and 16-bit computers and video game consoles, as well equally other limited systems like graphing calculators, is pixel art.
Developers choose pixel art over any other artwork style because information technology's easier to learn and practice. You can draw pixel-art in a short fourth dimension-frame, it'south also easy to re-do if you modify elements in your game, you don't have to mitt-describe all your sprites over again and tin can often make adequately unproblematic modifications; as opposed to those cute artistic games similar Limbo. Some other reason is to appeal to the older generation (nostalgia).
Recently nosotros've seen a resurgence in pixel games. Some examples of Pixel Fine art games include:
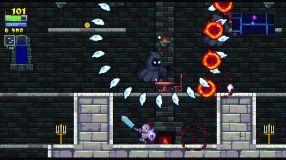
ROGUE LEGACY (2013) – is frustrating as all hell when you first boot it up, but as you larn the intricacies and the pixel-perfect commands, information technology opens up.

SHOVEL KNIGHT (2014) – is a nostalgia inducing side-scrolling run a risk platformer, supported with a chip-melody soundtrack, intentionally designed like old 8-bit games.
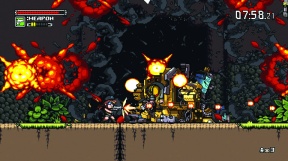
MERCENARY KINGS (2014) – is a Shoot-'em-up game inspired past Metal Slug, just with a much more than fluid experience, and with gorgeous animations.

FEZ (2012) – is a Trans-Dimensional Puzzle Platformer. Fez is unusual as a pixel game, because the voxels that make upwards everything in the game world are actually rendered in 3D – game designer Phil Fish crafted custom 2nd pixel fine art and his developer, Renaud Bédard, designed software that wrapped each custom tile-face to the side of each voxel, making the game look 2D whilst operating in 3D.

SUPERBROTHERS: SWORD & SWORCERY EP (2011) – Not-Vocal Adventure
A game that managed to break through in both the East and the West, Sword & Sworcery EP was one of the first hugely successful fine art games released on iOS.
Concept
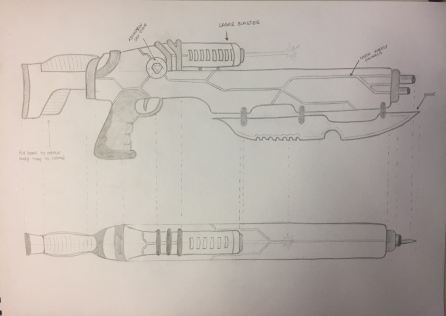
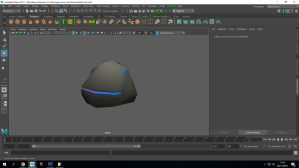
Modelling the gun
24-hour interval 1 –
Today I started to model the bones shape of my gun using cubes and basic primitives, working on from them, adding item as i went. Before modelling though, I imported my concept art equally paradigm planes to aid calibration and have an easier reference to model from. I started off by making the master torso of the gun using a basic cube ( roughly shaped similar the gun), adding cuts and extruding out the grip and adding detail bit by flake. I used the same principles to model the telescopic (using a cylinder instead of a cube as a base object), the stock and the blade. To create the trigger guard I fabricated a line straight through the model by selecting all the middle faces and "Edit Mesh > Connect" and clicked enter. And so I selected 2 vertices where the trigger was going to be, bevelled them, and extruded one of them towards the other, connecting the ii with the bridge tool.

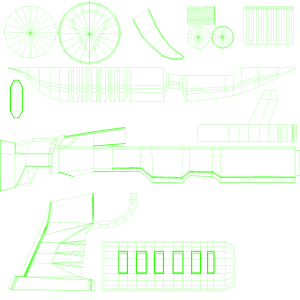
DAY ii –
On twenty-four hours two I divided my model into shells and unwrapped the UVs. Outset of all, In Photoshop, I planned out how my gun would be cleaved down. I came to the decision that my model would be fabricated out of iv main UV shells: the chief body (including the grip and trigger), the scope, the bract and the stock. 1 by one I unwrapped these shells into flat UVs, using cylindrical projection for the scope and planar projection for the rest of the gun. Finally I moved all the shells effectually to fit the canvas, which I and so exported as a 2048×2048 UV snapshot.
Mean solar day 3 –
On day iii, I painted the gun texture using Adobe Photoshop and practical it to the gun using Maya's Hypershade.
I wanted my gun to await like something out of Overwatch, and so I stuck to vivid saturated colours. Later I had my thought all drawn out in Photoshop, to add that actress depth and sense of realism, (on a new layer) I went over the gun with a big soft black brush covering all the lower areas of the gun. This gave my gun the illusion of global illumination.
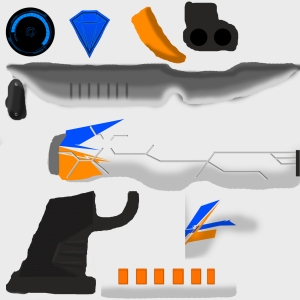
To make the free energy channels on the gun seem like they were bevelled into the actual weapon, I created a normal map and connected it to the normal texture node in the hypershade editor, giving it three dimensional detail.

Animative the gun
Twenty-four hours four –
Today I animated my gun's reload, primary firing and secondary firing animations in Maya. The commencement stride was to draw out the skeleton / os structure that my gun would have to make it easier to animate. I chose the grip equally the parent and the trigger and stock as children splitting one-half manner.
I chose this specific structure because for my animations it would exist easier to rotate the whole gun (simulating recoil) since the grip is the parent, and to movement the trigger and stock every bit children of the grip and then that they would move accordingly with the gun, and not stay in place.
 When animating I looked at a couple of guns from the game Overwatch for reference to the firing speed and recoil speed / corporeality. This made it easier to keyframe. The rest of the process was calculation keyframes to the timeline (by pressing "s") and moving them along by trial and error, getting the whole animation to play out smoothly.


When I was happy with the final outcome, I exported them equally a .fbx blitheness
Implementing the gun in game
Twenty-four hour period 5 –
On Twenty-four hour period 5 I implemented the gun into my game then it would replace the stock weapon in an Unreal Engine 4 BP.
I did this by importing the iii animations and the master gun mesh into Unreal Engine (selecting the main mesh skeleton as reference when importing the animations), and so, to replace the stock weapon with mine, I opened the FirstPersonCharacter BP and replaced the stock weapon mesh to my gun mesh and replacing this lawmaking in the event graph.
 After re-positioning the gun in the viewport to a desired look, this was the final consequence.

Lazy texturing is a quick way of shading a model using only gradients in Photoshop. Here are some examples taken from pinterest:

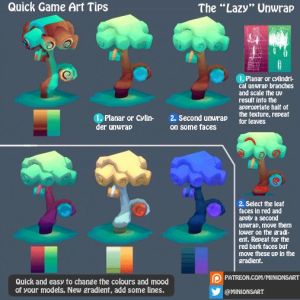
In this example I am going to "lazy texture" a rock and a tree using the aforementioned technique.
Having made the texture with the gradient tool, in Autodesk Maya I start off by adding a new material to the model, then in the Hypershade window, I open the Graph network, select the fabric and connect a "file" node to the colour section (importing the gradient texture fabricated in Photoshop in the file attributes).

Next, I open the UV editor and move, calibration and rotate the beat of the model to achieve the desired effect/colour gradient. To add together extra details similar small darker shadows or cracks to the model, I select the private faces that I want and apply a planar UV to this choice. back in the UV editor I move this selection, that is split/disconnected from the residue of the model, across the texture to reach the desired style.


There are few fundamental distinctions betwixt textures and materials. For example, you cannot employ a texture on a static mesh or BSP geometry. Textures have to be a role of a material. The material is what you lot would use to texture your surroundings and apply to Static Meshes.


Hither is an case of quick world I shaded with materials, that were made upward of textures.
TEXTURES
A Texture is a unmarried file, a 2nd static paradigm. Information technology is usually a diffuse, specular or a normal map file that you would create in Photoshop or Gimp, as a tga, tiff, bmp, png file. These tin be manipulated photographs, hand-painted textures or textures broiled in an application such as xNormals. You would so import these textures into whatever 3D program and employ them as part of a material (y'all cannot apply textures directly to objects, textures have to be a function of a fabric).


MATERIALS
Materials are made up of diverse textures combined together. Materials include various textures and fabric expressions that creates a network of nodes. The terminal result is a fabric you lot can apply to employ on your BSP geometry and on Static Meshes. Materials are what you see rendered in-game.

When texturing or applying materials to objects in 3D programs we normally utilise UV Maps to map the texture to the object. A UV Map is an aggregating of nets / flat spread out polygons of the 3D model onto a second airplane (making information technology easier to texture the object).

A net is a two-dimensional (2d) representation of a 3D shape.
Put simply, UV Mapping is a technique to apply a 2nd texture on a 3D Object. ("U" and "V" are the axes names of the 2nd Texture while "X", "Y" and "Z" are used for 3D Objects). Maya includes a lot of useful features for UV mapping projections such as planar, box, cylindrical, spherical, automatic as well as advanced UVs based on camera.
When UV mapping, you might run into some bug. These include stretching and overlapping. Stretching happens when polygons are laid in the UV map differently from their actual shape. To avoid stretches always check you model with a checky map applied on your model and make sure that the checkers await square and evenly distributed.


Overlapping means one UV goes over another UV. Generally, you need zero overlaps by the terminate of the process so that you can paint your texture over the unabridged surface of the model separately.
If nosotros were to, for example, texture this circuitous object, we would start by selecting the model and going to Create UVs > Planar Project (choosing Z as the projection axis). We would then apply the checker map texture so we could see the current UV layout and the amount of stretching. The model looks expert from the forepart view simply significant stretching is found on the sides and within.
To fix this we select the edges where stretching is shown and cutting the UVs, past going to Edit > Cut UVs. In this example, this will split the UVs into two parts.
 This Process will give the result as shown below:

Types of Texture Maps / Texture Types:
– Diffuse is the colour of the map; its visual appearance. This map by and large simply represents the base of operations colors. Less to no lighting information is present in the lengthened, because those furnishings come from the contribution of other map types, such as Specular maps and/or Normal maps.
– Specular maps command how reflective a surface is, and tin adjust the shape of the reflection. Specular usually simulates only the reflections of the brightest light sources in a scene (Black = Not Shiny / White = Shiny).
– Bump is a 2nd grayscale map that modifies shading of geometry, typically used for fine detail of a surface.
– Normal maps are 3D bump maps that modify Vertex normals to requite the appearance of higher detailed geometry. Put simply, they are used to fake higher detail lighting on lower poly meshes (Represented by RGB maps to help stand for XYZ values).
– Transparency , also known equally opacity, is used to cut out parts of a surface, usually for blastoff blending. For example: fire, grass, pilus, fume, water, windows, etc.

Example of a cube with Diffuse, Specular and Normal maps applied to it, to make information technology looked like a high quality model of a box:

For this task, nosotros had to create a UV texture to apply to a 3D house model.

I started off by importing the UV Map of the house model into Photoshop (changing the color of the outline by adding a solid colour fill to this layer).
I then created a new layer and started painting all parts with a base of operations glaze. To simulate a more accurate wood grain and an anile wall, I added new layers and, with a lighter colour than the base one, drew outline strokes (alternating thick and thin brushes for extra detail).


(I also labelled each part to brand it easier to locate them and pigment them accordingly)
For the final touches, I added a terminal layer, set up its blending mode to multiply and painted shadows around the lesser of the house walls, inside the chimney and around the tiles.


Overall I retrieve that my texture came out actually skilful. This time I used a graphics tablet to pigment, instead of a mouse, and I have to say that the process was easier and seemed more artistic and straight forward.

I started off past creating a new 512×512 pixel canvas with a night chocolate-brown groundwork (base of operations wood layer).
To create a more accurate texture and forest grain, I added a new layer and, with a lighter brown colour, drew downward strokes (alternating thick and thin to add extra particular).


I then started roughly outlining the plank shapes with a light brown castor and used a night brown thin brush to add the shadows in the cracks.


For the last details, in separate layers, I added rivets and holes, and made the texture seamless using the kickoff technique.
 Overall I think that my texture came out actually skilful. In the future I would use a graphics tablet instead of a mouse for more authentic strokes and pressure level.
The Castor tool is a bones painting tool. It works like a traditional drawing tool past applying the color using strokes. It's located in the standard Tool Bar and its default shortcut is the alphabetic character B. The Brush Tool works past adding a shaped mark on a layer, and if y'all continue pressing the mouse push several marks will be added creating a stroke until you release the force per unit area. Photoshop includes several built-in presets, that are in fact pre-fabricated brushes fix to use.
The Pencil Tool is another basic painting tool located in the aforementioned identify as the castor tool. The main difference betwixt the two is that the Castor tool has anti-aliasing (resulting in a polish stroke) and the Pencil tool has aliasing (resulting in a harsh stroke).
Our first task was to create a sphere using the Brush Tool:
I started off by creating a new canvass and drawing a perfect blueish circle with the elliptical marquee tool (pressing down shift to maintain proportions). To create the shadow, I created a new layer and ready information technology to multiply and so "ctrl clicked" the circle layer thumbnail (to outline the shape selection – so that the shadow would simply appear on the circle and not exterior of it). finally I picked a smooth gray color and brushed a shadow on the circle. I used the same method for the highlight, but instead of multiply, the layer was set to screen.


Our 2d task was to colour and shade in an outline of a fish using the Brush tool.
Get-go of all, I removed the background from the base image using the Magic Wand Tool and removing additional watermarks using Colour Range.
Side by side, I changed the prototype mode from greyscale (set automatically past Photoshop) to RGB so that colours would testify.
I began colouring the fish, with two base of operations blueish shades and a vivid yellowish for highlights, without staying in the lines (this was stock-still subsequently) to brand the procedure faster and more efficient. I then used the same technique that I used for the sphere to add together shading and highlights the fish. To remove the imperfections, I selected the background with the Magic Wand tool (this created an outline around the fish) and for every layer clicked delete. The finished result was a fish perfectly coloured within the lines.


Source: https://giacomoverriseevic.wordpress.com/category/2d-art/
Post a Comment for "Pixel Art Laser Gun Flash Pixel Art Laser Muzzle Flash"